![]()
One of the Joys of Maturity
One of the Joys of Maturity |
|
Clicking through one of our banner ads or some of our text links and making a purchase will produce a small commission for us from the sale. Growing Geraniums from Seed If you have the right conditions, growing seed geraniums (geraniums from seed) is relatively easy. I set out in 2009 and again in 2010 to describe the process for others. I ended up experiencing almost every failure one could, along with making some really stupid mistakes along the way. Those blogs remain online as an exercise in writer honesty and humility. Since writing those pieces, I've gotten my act together again, as we've successfully grown seed geraniums for over thirty years.
Growing geraniums from seed has the advantage of not carrying disease forward as propagating from leaf and stem cuttings can do. With seed geraniums, you're not limited to just propagating varieties you have, but have the incredible variety of seed geraniums that are available from various seed catalogs. Self grown geraniums can be timed to match ones own transplanting schedule in the garden and flower beds. And...you may save a few bucks growing your own geraniums from seed over purchasing plants at a garden center or discount store if you avoid the mistakes I made in 2009 and 2010. Seed We got most of our geranium seed from Stokes Seeds and Twilley Seeds. Stokes left the home garden seed business in 2020 and Twilley has disappointed us in the last few years with poor seed quality. But they do carry our favorite Maverick Red variety (shown above right) and many other varieties of geraniums. Shopping for bargains on geranium seed never seems to work out for us. Inexpensive seed often turns out to be old seed that doesn't meet our expectations for germination rates. Starting Seed
"Geranium seeds can be erratic in germination. Try rolling the seeds in damp paper towels and letting them 'pre-soak' in this way for two days before planting in flats." The late James Underwood Crockett in Crockett's Flower Garden echoes Bubel's advice with another suggestion: "Geranium seeds have a tough outer surface. If something isn't done to crack or soften this shell, germination is difficult. Most seed houses sell scarified seeds, which have been scraped to give the seeds a better chance to sprout. If you don't buy scarified seeds, it's a good idea to soak them for 24 hours in warm water."
We've started our geraniums in a couple of different ways over the years. Some years we have direct seeded the geranium seed into small flower pots filled with a sterile potting mix and lightly surrounded the seed with vermiculite to allow some light to reach the seed.
At times, we've first germinated the geranium seed on brown (unbleached) coffee filters or unbleached white paper towels. I prefer the coffee filters over paper towels, as the emerging roots don't stick or grow into the coffee filters as much as they do with paper towels. The seed is spaced on a damp coffee filter which gets folded over the seed to ensure the seed gets all the moisture it needs. The coffee filter then goes into a Ziplock freezer bag In just a few days, often less than five, the seeds begin to sprout. Before the sprouts get too big, I very gently lift them from the coffee filter and place the seed in a slight depression in some sterile potting mix in a 3" pot or a fourpack cell. I then lightly cover, or more accurately, surround the seed with vermiculite to hold in moisture. One can also successfully start geraniums in fourpack inserts or small flower pots. Starting the seed on coffee filters allows one to just pot up seeds that have germinated. With flower pots, I use three inch plastic pots, twenty-one of which fit neatly into a heavy duty Perma-Nest
Note that using individual 3" pots allows me to spread out the plants as they begin to put on some size. When using fresh seed, we generally get a germination rate of around 75-85%. When using older seed we've kept frozen in our manual defrost freezer, the germination rate drops off into the 60% range.
Care As soon as the seed pushes out of the vermiculite and is an upright, if tiny, plant, I move them off the soil heating mat. While geraniums may need temperatures in the mid-70s to sprout, once up, they like a bit cooler temperatures.
The plants stay under our plant lights, which are simply 48" shop lights with 5400-6500° K fluorescent tubes in them. I keep the lights several inches above the top of the tallest plant. If the leaves begin to bleach out, I know my lights are too close to the plants. But from this point on, geraniums are pretty forgiving plants.
Other than regular, usually weekly, watering, the geraniums don't require any special care. The potting mix has all the nutrition they need at this point, so fertilizing isn't necessary or recommended. I only bottom water our plants, as they're grown in watertight trays that makes bottom watering easy.
We often experience a real logjam under our plant lights each spring, necessitating a bit of inventiveness to keep all of our plants and transplants growing well. We're fortunate that our large, old farmhouse has a sunroom with lots of south facing windows. Unfortunately, the builder didn't duct the room into the heating and air conditioning system, so the room is hot in the summer and cold in the winter. But with an oil heater, I can usually begin moving geraniums, onion and brassica transplants, and even some gloxinias to the room in late January or early February. While the baby geranium plants in the three inch pots initially used are really cute, they rather quickly need more root space. Just two months after seeding the plants, they get moved to 4 and/or 4 1/2 inch flower pots to continue their growth. At this point, sterile soil isn't necessary to prevent damping off disease, as the plants have developed pretty tough stems. I use commercial potting soil cut with about one-third peat moss for the transplanting. Although I avoid potting soil with fertilizer pellets and perlite in it for seed starting, it's ideal for plants at this stage of growth. I did this transplanting, as I often do, outside on a warm spring day. Our nights, however, weren't warm enough yet to risk moving the plants under our cold frame to begin hardening off. So once again I had to get a little creative on plant space, putting both our standard geraniums and the ivy leaf ones, now in hanging basket pots, on our dining room table in front of a large, east facing bay window.
Hardening Off Plants grown inside under artificial lighting or in a greenhouse need to be hardened off before being transplanted into the garden. Indoors, they've not had to face the rigors of bright, hot sunlight, cool nights, UV radiation, and strong winds. If not hardened off, transplants often quickly fail under the harsher outdoor growing conditions.
We harden off our transplants under a homemade cold frame. The frame gets completely closed at night to hold in the warmth of the day, but is opened gradually through days to allow our transplants more and more exposure to the harsher growing conditions outdoors. During this time, stems and leaves toughen, getting the plants ready to survive in the ground.
Our old, wooden cold frame rotted out a few years ago, so I constructed a new one that wouldn't rot out, made of PVC pipe and fittings. I'm not entirely happy with the new frame, as I made it too tall, allowing it to dissipate too much heat on cold nights. It's also too light, having blown away in the wind a couple of times. I corrected that problem by cutting open the bottom back PVC pipe and putting a bit of damp concrete in it! Typically, our geraniums are some of the last of our transplants to go under the cold frame to harden off. The process of exposing them to outdoor growing conditions takes a week or two. What do we do with our geraniums? We grow lots and lots of geraniums each year, sometimes forty or more! We do so because we like to put a geranium at each corner of our raised garden beds. We also use them at the ends of rows, replacing the wooden stakes used in planting with something much more attractive.
Geraniums mixed with petunias, vincas, marigolds, and snapdragons almost steal the show from our vegetables, the reason we garden. And while vegetable crops come and go in succession through a growing season, our geraniums and other flowers stay put, gloriously blooming all summer and fall. Links If you came to this page looking for my previous comedy of errors geranium blogs, they're still available as the first two links below.
Here are some other links about growing geraniums that may prove helpful.
Closing We had successfully grown geraniums from seed for years. Then in 2009 and again in 2010, I decided to record the process in blogs. Whether I got too cocky about our previous success or just had bad luck, I don't know. I made some horrible mistakes those two years, and then and later suffered from getting bad seed. After being thoroughly humbled about my geranium growing abilities, I became much more careful about our practices, and we returned to growing all the geraniums we could use and give away once again. It's a good feeling. We're now growing a few less geraniums than in the past. Having used them at the corners of our raised beds for years, I think we've run into some rotation needs. I've begun alternating geraniums and vinca at the corners of our raised beds with good results. That change resulted in lots more geraniums along the sides of our raised beds in years where vincas were the corner anchors. Even with some new physical challenges from hip and heart surgeries in 2015, gardening proves to be one of my greater joys in life. I hope the Lord allows me to keep doing it and blogging about it for some time to come.
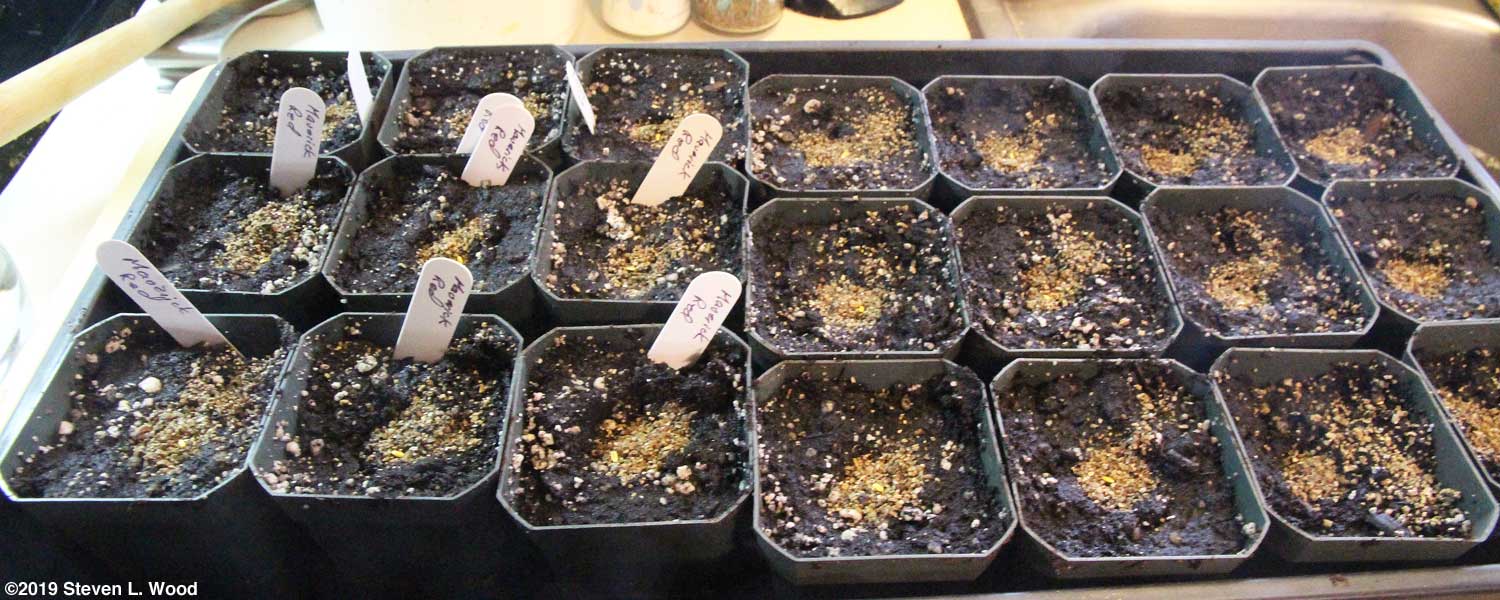
The pots were filled, of course, with sterile potting mix. I made a small depression in the center of each pot with my finger and filled it with vermiculite. Then a single seed was pushed into the vermiculite. The tray was covered with a clear humidity dome and placed under our plant lights over a soil heating mat running at about 77° F. We ended up getting nineteen geraniums out of the twenty-one pots seeded. Another pot, after re-seeding, has put up a sprout. I moved the geraniums plants to a bookshelf next to south facing windows in our very cool sunroom several days ago. While the image above right shows the leaves of the geraniums facing the camera and away from the windows, that's because I'd just turned the tray 180°. I have to turn all the trays of plants in the sunroom every few days to promote upright growth. This year's plants include Maverick Red, Maverick Mix, Multibloom Mix, and Pinto White to Rose.
Contact Steve Wood, the at Senior Gardening |
last updated 1/20/2020
©2015 Senior-gardening.com